back to main 'Garage Opener' page


How to get +12v from the Cruise buttons instead of the high beam switch:

You may click a photo for an enlargement.

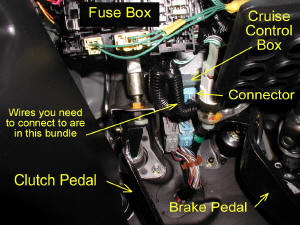
First locate the Cruise Control module
by looking under the driver's dash

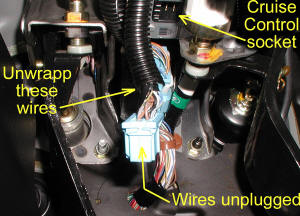
Unplug the wire harness from the Cruise
module so you can get to the wires


  Here's a close-up of the connector. 

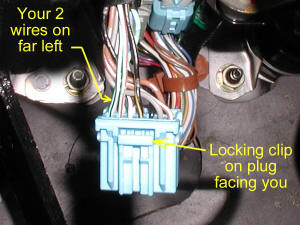
Using a T-tap connector splice into the
light green/black (far left) wire if you want to use the RESUME button to activate the remote.  Use the light green/red wire for the SET button.

When you are done with this splice, plug the connector back in and run your wire to your garage remote.  This wire will provide +12v when you press the Cruise button.
 

Wiring for 6v and 3v garage remotes:

You'll need these parts, available from Radio Shack (part numbers listed) or any other electronic parts house.

bulletOne LM-317T adjustable voltage regulator  (RS# 276-1778, $1.99)
bulletOne 220 ohm resistor (RS# 271-1111   5/$.99)
bulletTwo 0.1uf capacitors (RS# 272-135) This is a change, fixes a problem on some remotes
bulletFor 3v remotes -  one 330 ohm resistor (RS# 271-1113   5/$.99)
bulletFor 6v remotes - one 1000 ohm resistor (RS# 271-1118   5/$.99)

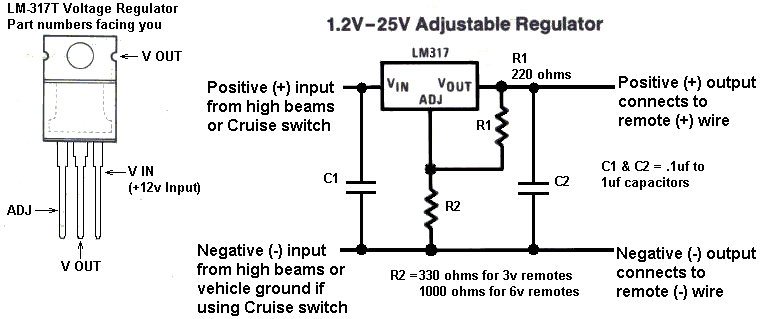
Refer to this drawing to see how to wire the LM-317 voltage regulator to reduce 12v to either 3v or 6v.  Be careful of two things:

1.  The pins on the regulator are NOT in the same left-to-right order as shown in the schematic.  The schematic makes it look like the 'V in' terminal is on the left of the regulator but it's actually on the right.  Use the photo of the regulator to determine which pin to connect to.

2.  The metal case of the regulator is the same as the 'V out' terminal.  You cannot use the nice handy tab to screw the regulator to the car - it will fry.  Make sure to insulate the tab or put the whole thing in a small project box which you can get at Radio Shack for a few bucks.

back to main 'Garage Opener' page